
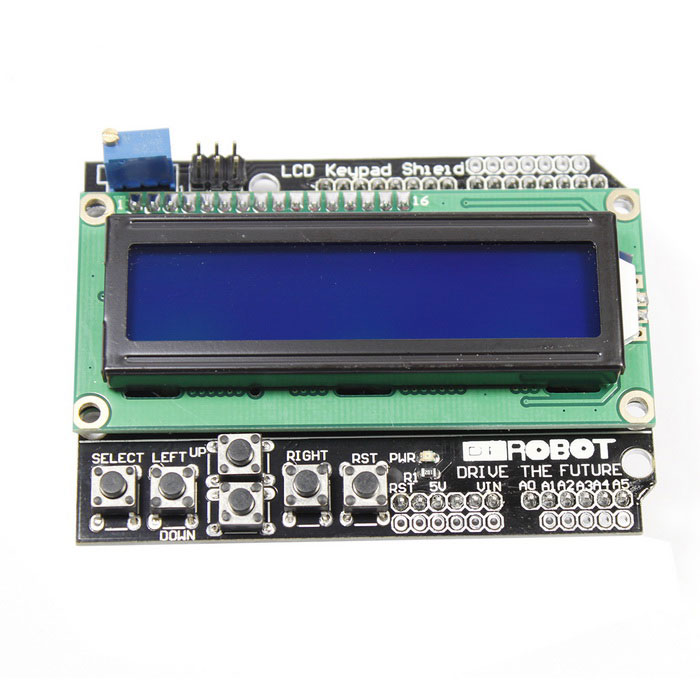
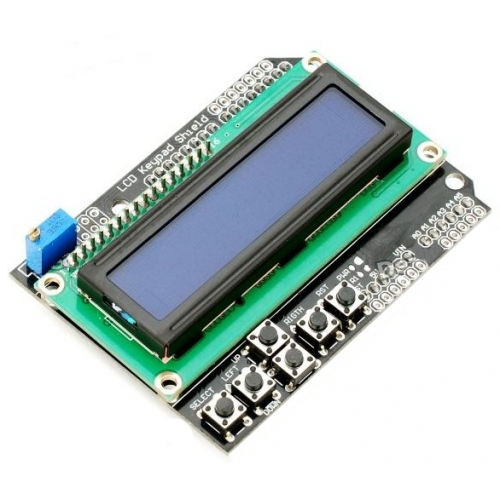
Arduino LCD 1602 KeyPad Shield จอแสดงผล LCD ขนาด 16 ตัวอักษร 2 บรรทัด พร้อมปุ่มกด
| รหัสสินค้า | A106 |
| หมวดหมู่ | จอแสดงผล LCD / LED / OLED |
| ราคา | 165.00 บาท |
| สถานะสินค้า | พร้อมส่ง |
| ลงสินค้า | 26 พ.ค. 2560 |
| อัพเดทล่าสุด | 3 พ.ค. 2567 |
| คงเหลือ | 6 ชิ้น |
| จำนวน | ชิ้น |
หยิบลงตะกร้า

รายละเอียดสินค้า
Arduino LCD 1602 KeyPad Shield จอแสดงผล LCD ขนาด 16 ตัวอักษร 2 บรรทัด พร้อมปุ่มกด
จอแสดงผล LCD ขนาด 16 ตัวอักษร 2 บรรทัด พร้อมปุ่มกด สามารถใช้ป้อนค่าปุ่มที่กดให้กับ Arduino เอาไปควบคุมข้อมูลต่าง ๆ ที่ต้องการได้อย่างสะดวก ไม่ต้องต่อสายเพิ่ม แค่เสียบก็พร้อมใช้งาน เหมาะสำหรับงานแสดงผลข้อมูลออกจอ LCD ที่ต้องการรับค่าปุ่มจากผู้ใช้ไปประมวลผล
The arduino LCD Keypad shield is developed for Arduino compatible boards, to provide a user-friendly interface that allows users to go through the menu, make selections etc. It consists of a 1602 white character blue backlight LCD. The keypad consists of 5 keys — select, up, right, down and left. To save the digital IO pins, the keypad interface uses only one ADC channel. The key value is read through a 5 stage voltage divider.
The arduino LCD Keypad shield is developed for Arduino compatible boards, to provide a user-friendly interface that allows users to go through the menu, make selections etc. It consists of a 1602 white character blue backlight LCD. The keypad consists of 5 keys — select, up, right, down and left. To save the digital IO pins, the keypad interface uses only one ADC channel. The key value is read through a 5 stage voltage divider.
ตัวอย่างโค้ด Arduino LCD Keypad จอแสดงผล LCD ขนาด 16 ตัวอักษร 2 บรรทัด พร้อมปุ่มกด
- เมื่ออัพโหลดเสร็จ สามารถปรับความสว่างของจอ LCD โดยหมุนตามเข็มนาฬิกาเพื่อให้ตัวอักษรเข้มขึ้น
//Sample using LiquidCrystal library
#include
/*******************************************************
This program will test the LCD panel and the buttons
Mark Bramwell, July 2010
********************************************************/
// select the pins used on the LCD panel
LiquidCrystal lcd(8, 9, 4, 5, 6, 7);
// define some values used by the panel and buttons
int lcd_key = 0;
int adc_key_in = 0;
#define btnRIGHT 0
#define btnUP 1
#define btnDOWN 2
#define btnLEFT 3
#define btnSELECT 4
#define btnNONE 5
// read the buttons
int read_LCD_buttons()
{
adc_key_in = analogRead(0); // read the value from the sensor
// my buttons when read are centered at these valies: 0, 144, 329, 504, 741
// we add approx 50 to those values and check to see if we are close
if (adc_key_in > 1000) return btnNONE; // We make this the 1st option for speed reasons since it will be the most likely result
// For V1.1 us this threshold
if (adc_key_in < 50) return btnRIGHT;
if (adc_key_in < 250) return btnUP;
if (adc_key_in < 450) return btnDOWN;
if (adc_key_in < 650) return btnLEFT;
if (adc_key_in < 850) return btnSELECT;
// For V1.0 comment the other threshold and use the one below:
/*
if (adc_key_in < 50) return btnRIGHT;
if (adc_key_in < 195) return btnUP;
if (adc_key_in < 380) return btnDOWN;
if (adc_key_in < 555) return btnLEFT;
if (adc_key_in < 790) return btnSELECT;
*/
return btnNONE; // when all others fail, return this...
}
void setup()
{
lcd.begin(16, 2); // start the library
lcd.setCursor(0,0);
lcd.print("Push the buttons"); // print a simple message
}
void loop()
{
lcd.setCursor(9,1); // move cursor to second line "1" and 9 spaces over
lcd.print(millis()/1000); // display seconds elapsed since power-up
lcd.setCursor(0,1); // move to the begining of the second line
lcd_key = read_LCD_buttons(); // read the buttons
switch (lcd_key) // depending on which button was pushed, we perform an action
{
case btnRIGHT:
{
lcd.print("RIGHT ");
break;
}
case btnLEFT:
{
lcd.print("LEFT ");
break;
}
case btnUP:
{
lcd.print("UP ");
break;
}
case btnDOWN:
{
lcd.print("DOWN ");
break;
}
case btnSELECT:
{
lcd.print("SELECT");
break;
}
case btnNONE:
{
lcd.print("NONE ");
break;
}
}
}
วิธีการชำระเงิน
-
ชำระเงินค่าสินค้าโดยการโอนเงินเข้าบัญชีด้านล่าง โดยลูกค้าสามารถโอนเงินหลังทำรายการสั่งซื้อได้ทันทีไม่ต้องรอยืนยัน
-
หลังจากโอนเงินแล้วสามารถแจ้งชำระเงินได้ที่ เมนูแจ้งชำระเงิน
หรือชำระเงินผ่าน PayPal โดยคลิกที่ ชำระเงินออนไลน์
ชำระเงินผ่านธนาคาร
ชำระเงินด้วยการ Scan QR


ดิศรณ์ ตันติเกตุ
098-xxxxxx-2
Accept All Banks | รับเงินได้จากทุกธนาคาร
ชำระเงินออนไลน์
- ค่าธรรมเนียม 3.9% + 11 THB
- การชำระผ่าน PayPal คุณไม่จำเป็นต้องแจ้งชำระเงิน เนื่องจากระบบจะจัดการให้คุณทันที ที่คุณชำระเงินเสร็จสมบูรณ์


- พิมพ์ “GenLogic” ในช่อง Search
- หรือเข้าจากรายการร้านค้าโปรดของฉัน
เข้าร่วมร้านค้า Arduino4
ร้านGenLogic
/www.genlogic.co.th/
สมัครสมาชิกร้านนี้ เพื่อรับสิทธิพิเศษ

▲
▼
รายการสั่งซื้อของฉัน
รายการสั่งซื้อของฉัน
ข้อมูลร้านค้านี้

GenLogic
ขายบอร์ด Arduino และอุปกรณ์อื่นๆ ที่ใช้ร่วมกับ Arduino รวมถึง Microcontroller, Module, Breakout board, Sensor และอุปกรณ์อิเล็กทรอนิกส์ต่างๆ ในราคาถูก เหมาะสำหรับผู้ที่สนใจเกี่ยวกับ Arduino และการโปรแกรมระบบ Microcontroller และอิเล็กทรอนิกส์ทั่วไป และทำโปรเจคต่างๆ ร้านมีสินค้าสต็อกพร้อมจัดส่ง จัดส่งสินค้ารวดเร็วภายใน 1-2 วันทำการเท่านั้น
เบอร์โทร :
อีเมล : sale@genlogic.co.th
อีเมล : sale@genlogic.co.th
ส่งข้อความติดต่อร้าน
เกี่ยวกับร้านค้านี้
ค้นหาสินค้าในร้านนี้
ค้นหาสินค้า
สินค้าที่ดูล่าสุด
บันทึกเป็นร้านโปรด
Join เป็นสมาชิกร้าน
แชร์หน้านี้
แชร์หน้านี้
↑
TOP เลื่อนขึ้นบนสุด
TOP เลื่อนขึ้นบนสุด
สินค้าในตะกร้า ({{total_num}} รายการ)

ขออภัย ขณะนี้ยังไม่มีสินค้าในตะกร้า
ราคาสินค้าทั้งหมด
฿ {{price_format(total_price)}}
- ฿ {{price_format(discount.price)}}
ราคาสินค้าทั้งหมด
{{total_quantity}} ชิ้น
฿ {{price_format(after_product_price)}}
ราคาไม่รวมค่าจัดส่ง
➜ เลือกซื้อสินค้าเพิ่ม